NC Protect in Azure Marketplace
For your convenience, NC Protect is offered as an Azure app in both Azure Marketplace and Azure Government Marketplace. You can use your Azure credits to purchase and install the solution via the Marketplace.
The following steps outline how to install NC Protect from Azure Marketplace only. Please follow the steps in the User Manual for non-Marketplace deployments.
1. Downloading the NC Protect App from Azure Marketplace
- First, go to the Azure Marketplace and download the NC Protect app using the 'Get it Now' button. https://azuremarketplace.microsoft.com/en-us/marketplace/apps?search=archtis&page=1
- Follow the prompts to purchase, install and deploy the package.
2. Deploying the NC Protect App:
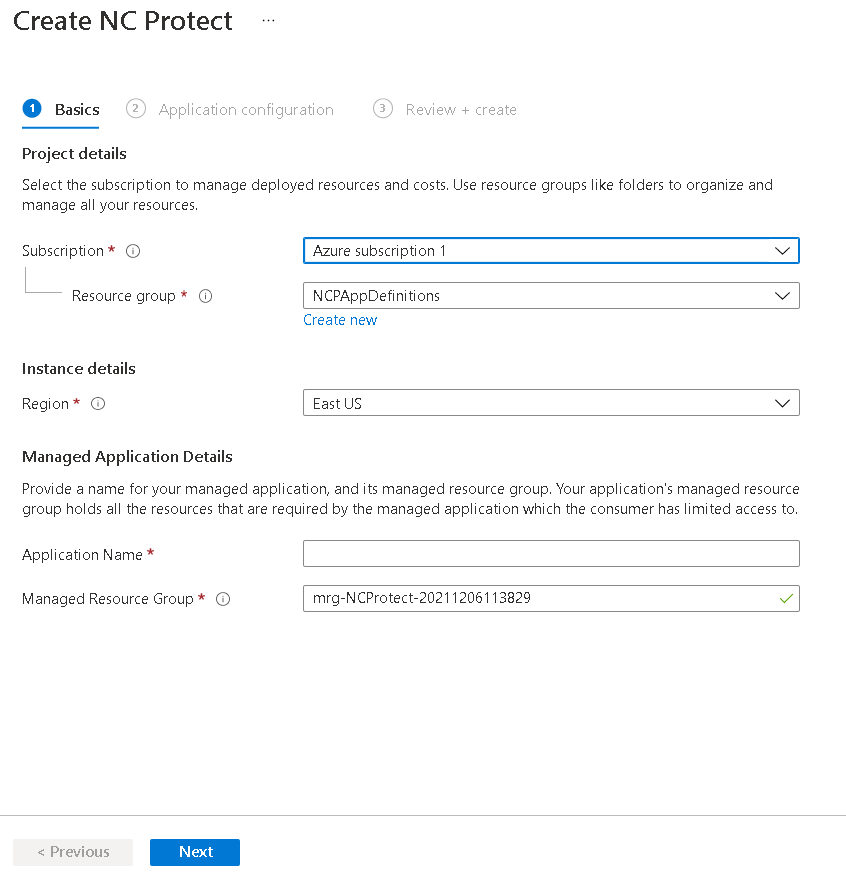
- In your Azure portal, click on 'Create a Resource'.
- Search for 'NC Protect'.
- When the 'NC Protect' suggestion appear, click on it.
- Enter the details where you can create a new resource group or use the existing resource group. Managed resource group will be used during installation to deploy the app service. Click ‘Next’.
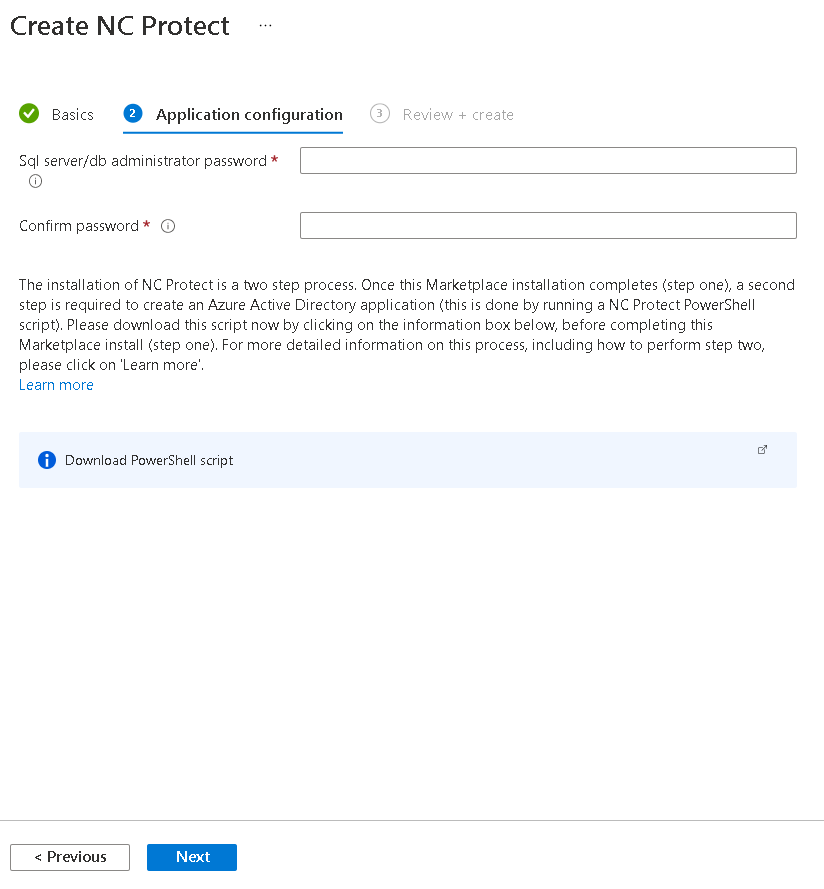
- Enter the SQL password and click “Download PowerShell script” to download the ‘NCProtectO365Setup.zip’ package file required for post configuration after the app creation. Click ‘Next’.
- Verify the details and click on ‘Create’.
- Deployment will take few minutes. Once done two resource groups will be created (‘NCProtect_MainGroup’, ‘NCProtect_SubGroup’). NCProtect_MainGroup will have NCProtect App and all the NC Protect resources like App service etc. will be created under NCProtect_SubGroup.
3. Post Deployment Steps
- Click the Cloud Shell icon (>_) in the top right corner of the screen.
- In the Cloud Shell welcome menu, click PowerShell. Using the upload button from the Cloud Shell menu, select ‘Manage file share’ option.
- Upload the NC Protect distribution zip file downloaded in the step 11 in the root directory or create a new directory and upload it under the new directory.
- Navigate to the directory where the zip file is uploaded and unzip the NC Protect distribution using PowerShell command unzip ./NCProtectO365Setup.zip
-
Navigate into the “scripts” folder and run the deployment PowerShell script ps1
For Microsoft 365 Government Community Cloud High (GCC High) Users
PS C:\Temp\NCProtectO365\CZ.SecuritySheriff.Deployment\Scripts> .\NCProtectPostConfiguration.ps1
an additional parameter should be supplied:
PS C:\Temp\NCProtectO365\CZ.SecuritySheriff.Deployment\Scripts> .\NCProtectPostConfiguration.ps1 -AzureCloud "USGovernment" - Provide the resource group name (e.g. NCProtect_SubGroup) created in step 13 as managed resource group.
- Available subscriptions will be displayed for the given Azure tenant Administrator account. Enter the number of the subscription to be used for the installation.
- Verify the resource group name and type ‘Y’.
- Enter the custom domain if available else press enter to skip.
- Enter ‘Y’ to register NC Protect with azure AD.
- Once the deployment has been completed into Azure, to create the NC Protect Azure Active Directory Application and to add the required API permissions to the NC Protect Azure Active Directory Application a link and code will be given in the PowerShell window. Click on the link and enter the code, click ‘Next’ and select the user and click ‘Continue’. Once done close the browser.
- To grant admin consent to NC protect application API permissions, there will be a link given on the PowerShell window along with the code. Click on the link and enter the code, click ‘Next’ and select the user and click ‘Continue’. Once done close the browser.
- Enter ‘Y’ to auto-configure NC Protect App service.
- Provide a password to user activity logging database.
- On completion, the link will be given to open NC Protect Administration Page.
Requesting a License Key
When you install NC Protect from Azure Marketplace, the installation includes a 30-day temporary license. You can request a license key by logging a support ticket through the Customer Ticket Portal. Sign-up for a Help Center account here.
Once you've created an account, you can also search the full Knowledgebase or view the Customer Portal to log in and check on support tickets.